
Installing a steel frame for your home is a complex but rewarding process. By following these 15 expert steps, you’re well on your way to creating a durable, efficient, and beautiful steel frame home. Remember, attention to detail at every stage is crucial for a successful build.
15 Expert Steps to Install a Steel Frame
- Site preparation
- Foundation layout
- Anchor bolt installation
- Base plate positioning
- Column erection
- Beam installation
- Joist placement
- Bracing
- Decking
- Wall framing
- Roof truss installation
- Sheathing
- Door and window framing
- Utility rough-ins
- Final inspection
Time: 2-4 weeks Cost: $15,000-$30,000 for materials
Today, I’m sharing my hard-earned knowledge to help you understand the intricate process of installing a steel frame for your dream home. This guide will save you time, money, and headaches by walking you through each step of the process.
Why Choose Steel Frame Construction?
Before we read the installation process,
let’s briefly discuss why steel frame construction is an excellent choice for your home:
- Durability: Steel frames resist rot, warping, and pests.
- Strength: They can withstand extreme weather conditions better than wood.
- Precision: Factory-made components ensure exact measurements.
- Speed: Installation is typically faster than traditional wood framing.
- Eco-friendly: Steel is recyclable and produces less waste.

Now, let’s get into the 15 expert steps for installing your steel frame.
Step 1: Site Preparation Before any construction begins, proper site preparation is crucial. This involves:
- Clearing the land
- Grading the site
- Compacting the soil
Pro tip: Don’t skimp on soil testing. I’ve seen projects delayed by months due to inadequate soil preparation.

Step 2: Foundation Layout Accuracy is key here. Use these tools for precise layout:
- Transit level
- Laser level
- Batter boards
- Mason’s line
Remember, even a small error at this stage can compound as you build upwards.

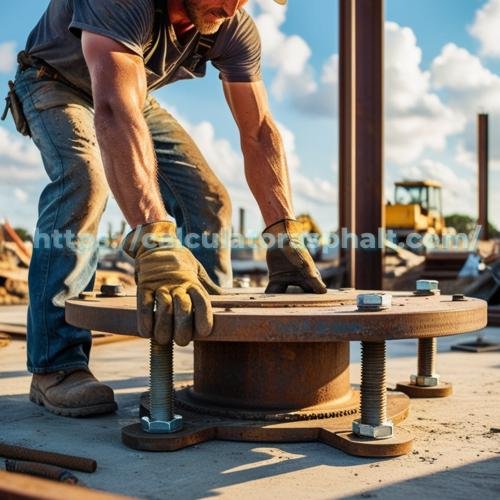
Step 3: Anchor Bolt Installation Anchor bolts connect your steel frame to the concrete foundation.
Key points:
- Use templates provided by the steel frame manufacturer
- Ensure proper embedment depth
- Check alignment multiple times before pouring concrete
Step 4: Base Plate Positioning Base plates distribute the load from steel columns to the foundation.
Ensure:
- Proper alignment with anchor bolts
- Level placement using shims if necessary
- Correct torque when tightening nuts

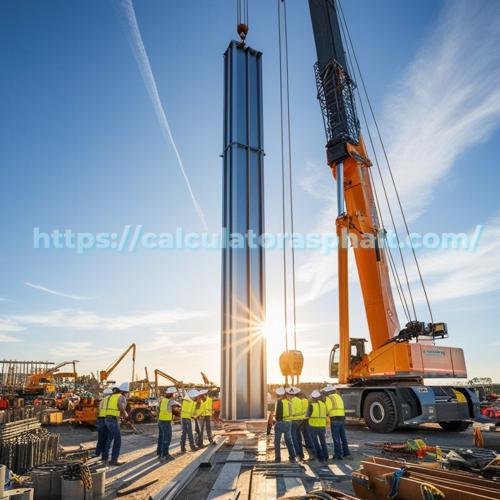
Step 5: Column Erection This is where your structure starts to take shape.
Remember:
- Use a crane or telehandler for safety
- Start with corner columns
- Temporarily brace each column as it’s erected
Safety first: Always use proper fall protection when working at heights.
Step 6: Beam Installation Beams connect your columns and support the upper floors.
Key points:
- Use the correct size and grade of bolts
- Ensure proper alignment before tightening
- Check level and plumb frequently
Step 7: Joist Placement Joists support your floors and ceilings.
Remember:
- Space joists according to engineering specifications
- Use joist hangers for secure connections
- Ensure joists are level across their span
Step 8: Bracing Proper bracing is crucial for structural integrity.
Include:
- Diagonal bracing
- Moment frames were specified
- Temporary bracing during construction
Pro tip: Don’t remove temporary bracing until all permanent bracing is in place.
Step 9: Decking Decking provides a working platform and contributes to structural stability.
Key points:
- Use appropriate fasteners for steel
- Ensure proper overlap at seams
- Cut precisely around columns and other obstructions
Step 10: Wall Framing Steel studs form your interior and exterior walls.
Remember:
- Use the correct gauge studs for load-bearing vs. non-load-bearing walls
- Install top and bottom tracks first
- Use self-tapping screws for connections
Step 11: Roof Truss Installation Trusses support your roof and define its shape.
Ensure:
- Proper lifting techniques to avoid damage
- Correct spacing and alignment
- Secure connections to the top plate
Safety note: Never walk on unsecured trusses.
Step 12: Sheathing Sheathing provides structural support and a base for exterior finishes.
Key points:
- Use appropriate sheathing for your climate zone
- Ensure proper fastener spacing
- Stagger seams for added strength
Step 13: Door and Window Framing Precise framing is crucial for proper door and window installation.
Remember:
- Use steel headers for larger openings
- Ensure openings are square and level
- Install sill pans for windows to prevent water infiltration
Step 14: Utility Rough-Ins Now’s the time for initial installation of:
- Electrical wiring
- Plumbing
- HVAC ductwork
Pro tip: Coordinate closely with subcontractors to avoid conflicts between systems.
Step 15: Final Inspection Before proceeding to interior and exterior finishes, conduct a thorough inspection:
- Check all connections for proper torque
- Verify that all required bracing is in place
- Ensure the structure is square, level, and plumb