I understand the importance of proper roof installation, especially when it comes to complex structures like hip roofs. Shingling a hip roof requires combination of technical knowledge, attention to detail, and practical experience. In this article, I will share my expertise and insights to help you achieve a flawless hip roof installation.
Understanding Hip Roofs
Defining Hip Roofs
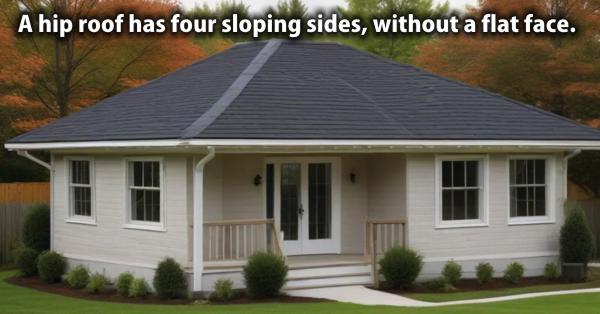
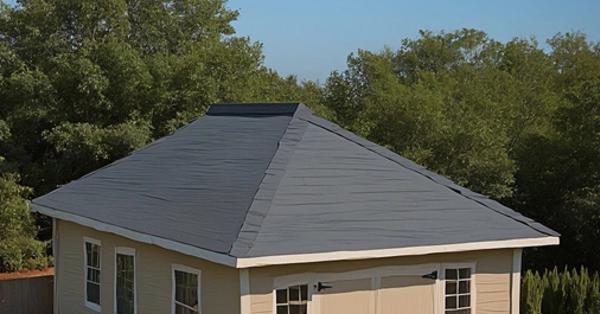
Hip roofs are a type of roof structure characterized by sloping planes on all four sides, creating a pyramid-like shape. I find hip roofs to be an aesthetically pleasing and structurally sound choice for many residential and commercial buildings. They offer excellent water-shedding capabilities and can withstand high winds, making them a popular option in areas prone to severe weather conditions. I bring expertise to shingling hip roofs, ensuring durability and functionality for years to come.
Benefits of Hip Roofs
Throughout my career, I have witnessed firsthand the advantages of hip roofs. They provide increased attic space and improved ventilation compared to gable roofs. Additionally, hip roofs distribute the weight of the roof more evenly, reducing stress on the supporting walls and increasing overall stability. This design also eliminates the need for vertical gable end walls, resulting in a sleeker and more streamlined appearance.
Preparation and Planning For Shingle Installation on a Hip Roof
Shingling a hip roof is a complex task that requires careful planning, proper materials, and attention to detail. By following the steps outlined in this article, you can ensure a successful and long-lasting hip roof installation. Remember to prioritize safety, use high-quality roofing materials, and follow the manufacturer’s instructions for the best results.
Proper installation techniques are crucial for a successful hip roof project. I recommend using a lineal feet measurement to ensure accurate cutting and overlap of the shingles. This approach not only enhances the aesthetic appeal but also reinforces the structural integrity of the roof. Additionally, hip roof shingles should be nailed securely following the manufacturer’s specifications, with extra attention paid to areas prone to prevailing wind exposure. By taking these precautions, homeowners can rest assured that their investment is protected for years to come.
Assessing the Existing Structure
I always recommend conducting a thorough assessment of the existing structure. This involves inspecting the roof deck, trusses, and supporting walls for any signs of damage or deterioration. Addressing these issues early on can prevent costly repairs down the line and ensure a solid foundation for the new roof.
Roof Deck Inspection Data Table
| Inspection Point | Description |
|---|---|
| Sheathing Condition | Check for any warped, rotted, or damaged sheathing panels that need replacement. |
| Fastener Integrity | Ensure that all fasteners (nails or screws) are securely holding the sheathing in place. |
| Moisture Levels | Use a moisture meter to detect any areas of excessive moisture or water damage. |
| Structural Integrity | Inspect trusses, joists, and supporting walls for any signs of sagging, cracking, or structural deficiencies. |
Safety Considerations During Shingle Installation on a Hip Roof
Working on roofs can be inherently dangerous, and safety should always be the top priority. I cannot stress enough the importance of utilizing appropriate fall protection equipment, such as safety harnesses and guardrail systems. Additionally, ensuring a clear and organized work area can help prevent trips, slips, and other accidents.
Hip Roof Shingling Techniques
Material Selection
Choosing the right roofing materials is crucial for a successful hip roof installation. I typically recommend asphalt shingles for their durability, affordability, and wide range of colors and styles. However, depending on the project requirements and personal preferences, alternative materials like cedar shakes, metal, or tile can also be considered.
Asphalt Shingles
Asphalt shingles are the most common roofing material used for residential and commercial properties. They are affordable, durable, and come in a variety of colors and styles. When shingling a hip roof, it’s essential to choose high-quality asphalt shingles that meet the local building codes and can withstand the climate conditions in your area.
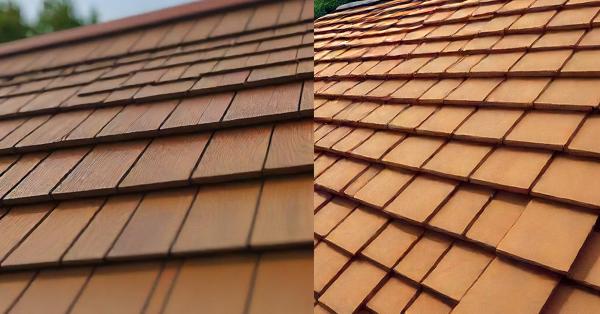
Wood Shakes
Wood shakes are a rustic and natural roofing option that can add character and charm to a hip roof. They are typically made from cedar, redwood, or pressure-treated pine and offer excellent insulation properties. However, wood shakes require more maintenance than asphalt shingles and may not be suitable for areas with a high risk of wildfires.
Synthetic Underlayment
Synthetic underlayment is a water-resistant barrier that is installed beneath the shingles to protect the roof deck from moisture and wind-driven rain. It is an essential component of any roofing system and can extend the life of the roof by preventing water damage and rot.
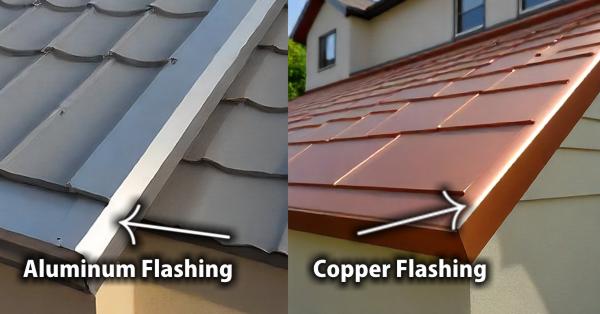
Aluminum Flashing
Aluminum flashing is used to seal and protect the intersections and protrusions on a hip roof, such as chimneys, skylights, and vent pipes. It is durable, lightweight, and resistant to corrosion, making it an excellent choice for flashing applications.
Copper Flashing
Copper flashing is a premium option that offers superior durability and longevity. It is more expensive than aluminum but can last for decades without deteriorating. Copper flashing is an excellent choice for high-end residential and commercial properties.
Asphalt Shingle Characteristics Data Table
| Characteristic | Description |
|---|---|
| Weight | Asphalt shingles typically range from 200 to 350 pounds per square (100 square feet). |
| Wind Resistance | Look for shingles rated for high wind speeds, typically 110 mph or higher. |
| Impact Resistance | Consider impact-resistant shingles in areas prone to hail or falling debris. |
| Fire Rating | Check the fire rating (Class A, B, or C) based on local building codes and safety requirements. |
Hip Ridge Installation
The hip ridges, where two sloping roof planes intersect, are a critical aspect of hip roof shingling. I recommend starting at the bottom of the hip ridge and working upwards, ensuring proper overlap and nailing patterns. Special hip ridge cap shingles or preformed hip ridge products can be used for a professional finish.
Hip Ridge Installation Step-by-Step
| Step | Description |
|---|---|
| 1 | Cut and fit the starter course of hip ridge shingles at the bottom of the hip. |
| 2 | Apply a generous amount of roofing cement or adhesive to the underside of the hip ridge shingles. |
| 3 | Nail each hip ridge shingle in place, using the appropriate nailing pattern and following the manufacturer’s instructions. |
| 4 | Ensure a minimum 6-inch overlap between each course of hip ridge shingles. |
| 5 | Repeat the process, working your way up the hip ridge until reaching the top. |
Valley Shingling
Valleys, where two sloping roof planes intersect to form a V-shaped channel, require special attention during hip roof shingling. I recommend using preformed valley flashing or woven valley techniques to ensure proper water diversion and prevent leaks.
Valley Shingling Data Table
| Technique | Description |
|---|---|
| Preformed Valley Flashing | Install a continuous metal or plastic valley flashing along the length of the valley. Shingles are then trimmed and overlapped onto the flashing. |
| Woven Valley | Cut and interweave shingles in an overlapping pattern, creating a tight, water-resistant valley without the need for flashing. |
Shingle Cutting
Hip roofs often require cutting shingles to fit around protrusions and irregular shapes. Use a roofing hatchet or utility knife to carefully cut the shingles to the desired shape, ensuring clean and precise cuts.
Nailing Patterns
Proper nailing patterns are crucial for securing the shingles and preventing wind uplift. Follow the manufacturer’s recommendations for nail placement and use the appropriate nails for the shingle type and roof deck material.
Flashing Placement
Flashing is essential for sealing and protecting vulnerable areas of the roof, such as valleys, chimneys, and skylights. Ensure that the flashing is installed correctly and integrated with the shingles for a watertight seal.
Finishing Touches
When it comes to hip roof construction, attention to detail is paramount. Proper installation of flashing around chimneys, skylights, and other protrusions is essential to prevent water infiltration and potential roof damage. Furthermore, the use of high-quality roof shingles, such as shakes or architectural asphalt shingles, not only enhances the visual appeal but also adds an extra layer of protection. Ensuring proper ventilation by incorporating roof ridge vents and following best practices for shingling over wood framing can significantly extend the lifespan of your roof while maintaining its structural integrity.
Ridge Cap Shingles
Ridge cap shingles are installed along the horizontal ridge of the hip roof, providing a finished look and protecting the roof from water infiltration. Use high-quality ridge cap shingles that match the color and style of the field shingles.
Hip Ventilation
Proper ventilation is essential for the longevity and performance of the roof. Install vents along the hip ridges to allow for airflow and prevent moisture buildup in the attic space.
Final Inspection
After completing the shingling process, conduct a thorough final inspection. Check for any missing or loose shingles, improper nailing patterns, or gaps in the flashing. Address any issues before considering the project complete.
Gutter Installation
If the existing gutters need to be replaced or new ones installed, this is the time to do it. Properly installed gutters will channel water away from the roof and prevent water damage to the foundation and siding.
Roof Sealant Application
Apply a high-quality roof sealant to any exposed nails, flashing, or vulnerable areas to ensure a watertight seal and prevent leaks.
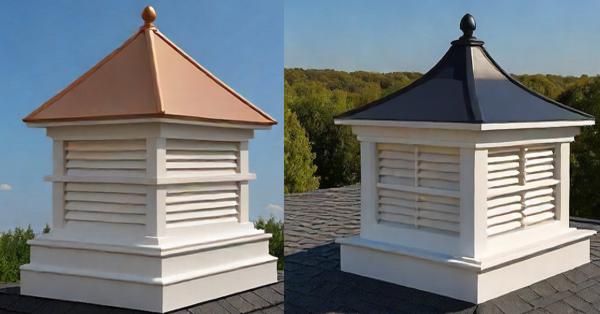
Fitting vinyl cupolas on hip roofs for homes
Fitting the vinyl cupola on the flat hip roof required creating a raised mounting platform that aligned with the roof pitch. We securely anchored the platform to the roof framing, then sealed and flashed the vinyl cupola base for a weathertight fit. The finished product not only enhanced the home’s curb appeal but also increased passive attic ventilation to combat Florida’s high humidity.
By choosing vinyl cupolas, these homeowners across different states achieved a blend of style, functionality, and low-maintenance durability tailored to their local climate conditions. Proper fitting techniques ensured a seamless integration with the existing hip roof structures.
California Case Study:
In Los Angeles, a classic Spanish-style home with a terra cotta hip roof needed an upgrade. The existing wood cupola had deteriorated over time due to the intense California sun and coastal air. We replaced it with a low-maintenance, UV-resistant vinyl cupola from Versatex. The new cupola perfectly complemented the home’s Mediterranean aesthetic while providing improved ventilation and weather resistance.
To securely fit the vinyl cupola, we first reinforced the hip roof framing and added a solid mounting base. The cupola was then carefully lifted into place and secured with stainless steel fasteners rated for the high winds common in the area. Proper flashing techniques were used to ensure a weathertight seal.
Texas Case Study:
A grand Victorian home in San Antonio featured an aging metal cupola atop its steeply pitched hip roof. The homeowners wanted to preserve the home’s classic charm while upgrading to a low-maintenance option. We recommended replacing it with an Azek vinyl cupola designed to withstand the intense Texas heat and potential hail storms.
Fitting the new cupola required careful measurements and planning due to the steep roof pitch. We reinforced the underlying roof structure to support the cupola’s weight, then seamlessly integrated the vinyl base directly onto the hip roof shingles using premium adhesives and sealants. The decorative vinyl cupola now crowns the home with timeless elegance.
Florida Case Study:
In Miami, a modern coastal home featured a flat, hip roof line that lacked architectural interest. To add character and improved ventilation, we installed a sleek, rectangular vinyl cupola from Kleer. This low-profile design complemented the home’s contemporary style while providing a unique focal point.
Important Roofing Tools
Roofing Nail Gun
A roofing nail gun is an essential tool for shingling a hip roof. It allows for faster and more precise installation of shingles, ensuring that they are securely fastened to the roof deck. A high-quality nail gun with depth adjustment and adjustable air pressure can save time and reduce fatigue during the installation process.
Roofing Hatchet
A roofing hatchet is a versatile tool used for cutting and shaping shingles, underlayment, and flashing. It features a sharp blade on one side and a hammer on the other, making it ideal for cutting and securing roofing materials.
Chalk Line Reel
A chalk line reel is used to create straight, parallel lines on the roof deck, ensuring that the shingles are installed in a uniform and visually appealing pattern. It is particularly useful for marking the starting course and keeping the shingle rows aligned.
Roofing Shovel
A roofing shovel is designed specifically for working on roofs. It has a flat blade and a curved handle, allowing for easy removal of debris and excess roofing materials from the roof surface.
Shingle Overlap Gauge
A shingle overlap gauge is a tool used to ensure proper overlap between shingle courses. It helps maintain consistent spacing and prevents the formation of gaps or voids that could compromise the roof’s integrity.
Important Queries Answered
What types of shingles are suitable for hip roofs?
Asphalt shingles, wood shakes, and metal roofing materials are all suitable options for hip roofs. Asphalt shingles are the most common and economical choice, while wood shakes offer a rustic and natural look. Metal roofing, such as standing seam or stone-coated steel, provides durability and longevity.
Do I need a permit to reshingle my hip roof?
In most jurisdictions, a permit is required for re-roofing projects, including hip roofs. Check with your local building department for specific requirements and regulations in your area.
How do I calculate the amount of shingles needed for a hip roof?
To calculate the amount of shingles needed, you’ll need to measure the total square footage of the roof area, including the hip and ridge sections. Consult the manufacturer’s guidelines for shingle coverage per bundle or square, and factor in waste and overlap allowances.
What is the proper nailing pattern for hip roof shingles?
The nailing pattern for hip roof shingles varies depending on the manufacturer’s recommendations and local building codes. Generally, you’ll need to nail shingles more frequently along the hips and ridges to ensure proper wind uplift resistance.
How do I properly install flashing on a hip roof?
Flashing should be installed at all valleys, hips, ridges, and protrusions on the roof. Start by installing valley flashing, followed by hip and ridge flashing. Ensure proper overlap and integration with the shingles for a watertight seal.
Can I shingle over existing shingles on a hip roof?
It is generally not recommended to shingle over existing shingles on a hip roof. The extra weight and uneven surface can compromise the integrity of the new shingles and lead to premature failure. It’s best to remove the old shingles and start with a clean roof deck.
How do I handle vents and chimneys when shingling a hip roof?
Vents and chimneys require proper flashing and integration with the shingles. Install flashing around the base of the chimney or vent, and carefully cut and fit shingles around these protrusions, ensuring a tight and watertight seal.
What safety precautions should I take when shingling a hip roof?
Safety should be the top priority when working on a hip roof. Use a fall protection system, such as a safety harness, and wear non-slip shoes. Avoid working in wet or windy conditions, and have someone assist you when carrying materials up the roof.
How do I maintain and extend the life of my hip roof?
Regular maintenance and inspections are crucial for extending the life of your hip roof. Inspect for any damaged or missing shingles, clear debris from valleys and gutters, and trim overhanging tree branches. Consider having a professional roofer perform an annual inspection.
Can I install ridge vents on a hip roof?
Yes, ridge vents can be installed on hip roofs to improve attic ventilation and prevent moisture buildup. Special hip ridge vents are available to accommodate the unique shape of hip roofs.
What is the best way to dispose of old shingles from a hip roof?
Check with your local waste management authority for proper disposal methods for old shingles. Many areas have specific guidelines or recycling programs for asphalt shingles and other roofing materials.
How long does it typically take to shingle a hip roof?
The time required to shingle a hip roof depends on the size of the roof, its complexity, and the number of workers involved. On average, a residential hip roof can take anywhere from a few days to a week or more for an experienced crew to complete.
Should I hire a professional roofer for a hip roof installation?
While it is possible for an experienced DIYer to tackle a hip roof installation, hiring a professional roofing contractor is generally recommended. Professional roofers have the expertise, equipment, and experience to ensure proper installation and adherence to local building codes and safety standards.
Key Takeaway
A well-shingled hip roof not only enhances the aesthetic appeal of your property but also provides reliable protection against the elements. Invest in quality materials, follow best practices, and consider hiring a professional roofing contractor if you lack the necessary experience or skills. A properly installed hip roof will ensure your home’s longevity and save you from costly repairs in the future.